How to get the most of the grid?
The grids in Antero are fully customizable, allowing users to make necessary changes for optimal grid functionality.
Understanding how to save layouts
Within each section, users can access a Tools Menu Option that provides a range of helpful tools to optimize grid usage within the program.
Users can access the Tools Menu in the toolbar of most sections in Antero. The options available will vary depending on the section you are in. With this menu, users can customize the grid layout and save these changes to their user profile. By right-clicking in the grid, users can define which columns are displayed, adjust the column order, and create groupings to suit their preferences.
- Save As My Layout: The Save as My Layout option will save the grid's physical layout a user has created in each section when the option is clicked.
- Use My View: Selecting the Use My View option will restore the grid to the previously saved layout that the user created by clicking the Save as My Layout option.
- Auto-Size Columns: Selecting the Auto-size Columns option will automatically adjust the width of each column to perfectly accommodate the data within, ensuring optimal visibility and readability
Customizing Grids
Now that we understand how to save grid layouts, let's explore how we can customize the grid to suit our requirements. The grids in Antero offer a wide range of powerful tools and options that may seem overwhelming at first. In this article, we will focus on key features to help you navigate and optimize your grid experience.
To access additional options for the grid headers, simply right-click on any of them. Let's start by exploring the Show Column Chooser window.
In the Show Column Chooser Window, users can easily select which columns are visible in the grid. Simply click on an option to display it or deselect it to remove it from the grid. You can also rearrange the order of the columns by dragging and dropping them within the chooser. Remember to customize your grid with the columns you use frequently and remove those that are not needed. Don't forget to click 'save as my layout' once you have selected your columns.

Tip: We strongly recommend that users customize their grids by selecting the columns they use regularly and removing any unnecessary ones. Remember to save your layout after selecting the columns.
Using Antero Grids
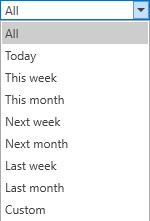
An essential feature found in various program sections allows users to apply a preset date range to efficiently filter records. This convenient drop-down menu is situated in the upper right-hand corner above the data grid.

When applying the filter, the date being referenced can either be the Date Scheduled or the Date Completed. Below is a breakdown of which date column is utilized by each filter in its respective section.
Grid Searching: The ABC Search Box located above the grid allows users to search for text-based records in columns containing text fields. By selecting the BeginsWith ![]() [begins with] option, users can choose between an A or B search. When A is highlighted, the search will filter text based on the beginning characters of the record. On the other hand, the Contains
[begins with] option, users can choose between an A or B search. When A is highlighted, the search will filter text based on the beginning characters of the record. On the other hand, the Contains ![]() [Contains] icon indicates that the search will look for any content containing the letters entered.
[Contains] icon indicates that the search will look for any content containing the letters entered.
Grouping: Grouping allows users to organize data shown on the grid by grouping the records in categories listed in the column header fields. The columns displayed on the grid will be based on which data is being grouped.
Enabling Grouping: To enable grouping, simply drag any column header up to the group panel at the top of the grid. You can create multiple groups by dragging additional headers onto the gray grouping taskbar. The grouping is done sequentially and appears in the order you set. Alternatively, users can right-click on a column header and select the option to group by that specific column.
The selected column will be used to group items together, reorganizing the records in the grid. Users will then see the information organized based on the selected grouping. To expand the data within a group, simply click on the arrow at the start of the group row. Alternatively, users can double-click on the row to expand the group for a more detailed view.
Removing Grouping: To remove grouping, simply right-click on the taskbar and choose the option 'Clear Grouping.' This action will eliminate the grouped categories and switch the grid back to a column view. Additionally, users can expand or collapse the grouped categories within this menu for better organization and visibility.